With the introduction of eSIM technology, managing multiple phone numbers on one device has become easier and more accessible than ever. In this blog post, I will guide you on how to Set up eSIM on iPhone. Follow the steps below to activate your eSIM and enjoy the benefits of this advanced technology.
Apple has supported eSIM since the iPhone XR and XS models, allowing users to easily switch between multiple SIM cards without removing the physical SIM. The US iPhone 14 series has no physical SIM card slot, while models in other countries support one physical and one virtual SIM card. iPhone 14 Series can also accommodate eight SIM cards simultaneously.
What is an eSIM?
An eSIM is a digital SIM card that allows you to use your carrier’s cellular SIM card without needing a physical SIM. It allows you to have multiple phone numbers and data plans on one device without the need to swap physical SIM cards.
Benefits of eSIM
- Space-saving
- Easy carrier switching
- Multiple phone numbers/plans
- Simplified international roaming
- Enhanced durability
- Faster device activation
- Reduced electronic waste
What are the benefits of eSIM while traveling?
eSIM offers numerous benefits for travelers, mainly including security. Because carrying or swapping the physical SIM can be problematic if the iPhone is lost or stolen. eSIM enables seamless connectivity while traveling. So you can easily change SIM settings, activate a stored eSIM and add more data as your carrier requires.
eSIM Requirements
To set up eSIM on iPhone, you’ll need to meet the following requirements:
- eSIM-compatible device (e.g., iPhone XR or later)
- Mobile carrier with eSIM support
- eSIM activation code (QR or manual)
- Unlocked device
- Your device is running on iOS 12.1 or later
How to Set Up eSIM on iPhone
To set up eSIM on your iPhone, follow these steps:
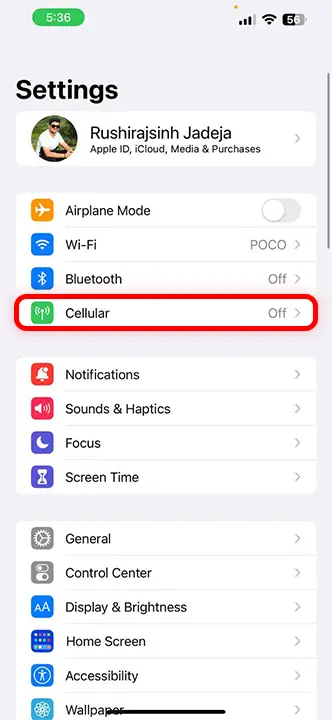
Step 1: Unlock the device and open the Settings app.
Step 2: Click on Cellular/Mobile Data.
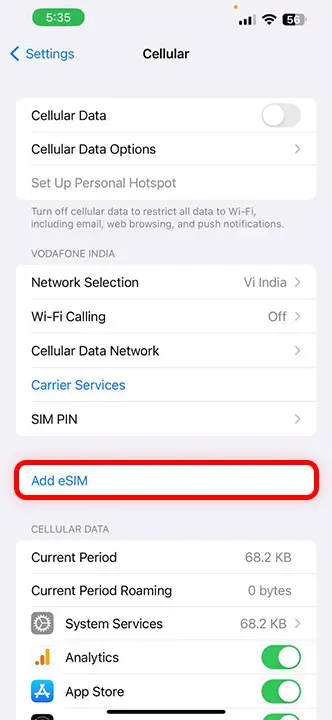
Step 3: Tap on Add eSIM button.
Step 4: Choose a transfer method.
- Scan the QR code provided by your carrier using your iPhone’s camera.
- If you received a manual activation code, select “Enter Details Manually” and input the information.
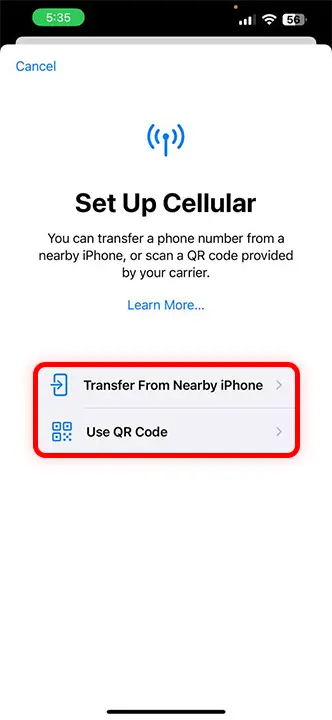
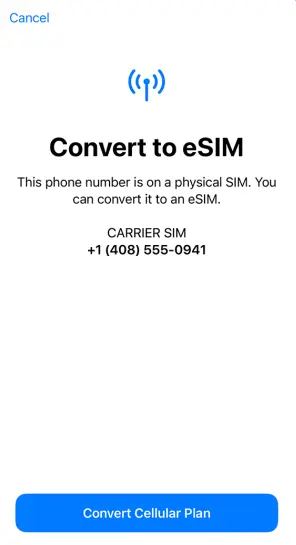
Step 5: Click on “Convert Cellular Plan” and Follow the on-screen instructions.
Note: You may need to enter details manually if the process is interrupted.
How to Remove eSIM from iPhone
To remove an eSIM from your iPhone, follow these steps:
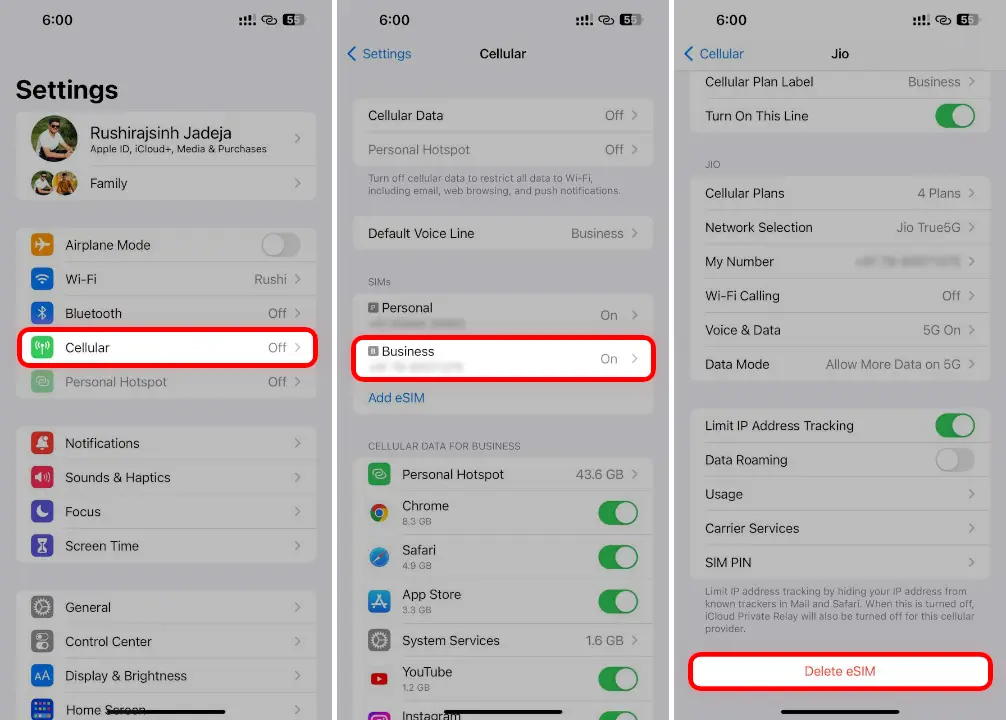
- Open the Settings app on your iPhone.
- Tap on Cellular/Mobile Data.
- Scroll down and Choose the eSIM you want to remove.
- Tap on the eSIM.
- Scroll down to the bottom of the screen and tap on “Delete eSIM”.
- Confirm the action by tapping “Delete” in the pop-up that appears.
After completing these steps, the eSIM will be removed from your iPhone. If you want to use the same SIM in the future, you will have to get a new activation code and repeat the above process.
Conclusion
Setting up an eSIM on your iPhone is a straightforward process that offers numerous benefits, including the ability to use multiple phone numbers and data plans on one device. By following the steps outlined in this guide, you can seamlessly activate your eSIM and experience the benefits of this innovative technology.
FAQ
Can eSIM be used while traveling internationally?
Yes, eSIM can be used for international roaming if your carrier supports it. You can also purchase a local eSIM plan from a carrier in the country you are visiting.
How do I activate eSIM on my iPhone?
To activate eSIM on your iPhone, open Settings > tap Cellular/Mobile Data > select Add Cellular Plan, and scan the QR code provided by your carrier or enter the activation details manually.