
Fix: This Device is Locked
Trouble with a Locked Xiaomi Device? Learn How to Bypass the “This Device is Locked” Error and Access Your Mi Account Again
Are you encountering the “This Device is Locked” error on your Xiaomi, Redmi, or POCO smartphone? You’re not alone. This common issue occurs in various situations, such as after purchasing an old phone, downloading a custom ROM, or performing a factory reset. We’ll guide you through simple and effective methods to resolve this error and regain the use of your smartphone.
There are several methods to fix this problem, and we provide detailed tutorials for each scenario.
What is the “This Device is Locked” Error?
The “This Device is Locked” error is a security feature in Xiaomi smartphones, designed to protect your data and device from unauthorized access. It usually appears after unexpectedly resetting your device, installing a new update, or custom ROMs. It’s an authentication feature that verifies the ownership of the smartphone.
To resolve this error, you need to enter your linked Mi Account credentials. Simply forgetting your Mi Account password, changing your phone number, or not remembering your Mi Account ID can trigger this issue. We’ll share some straightforward, legitimate methods to fix this error and regain control of your device.
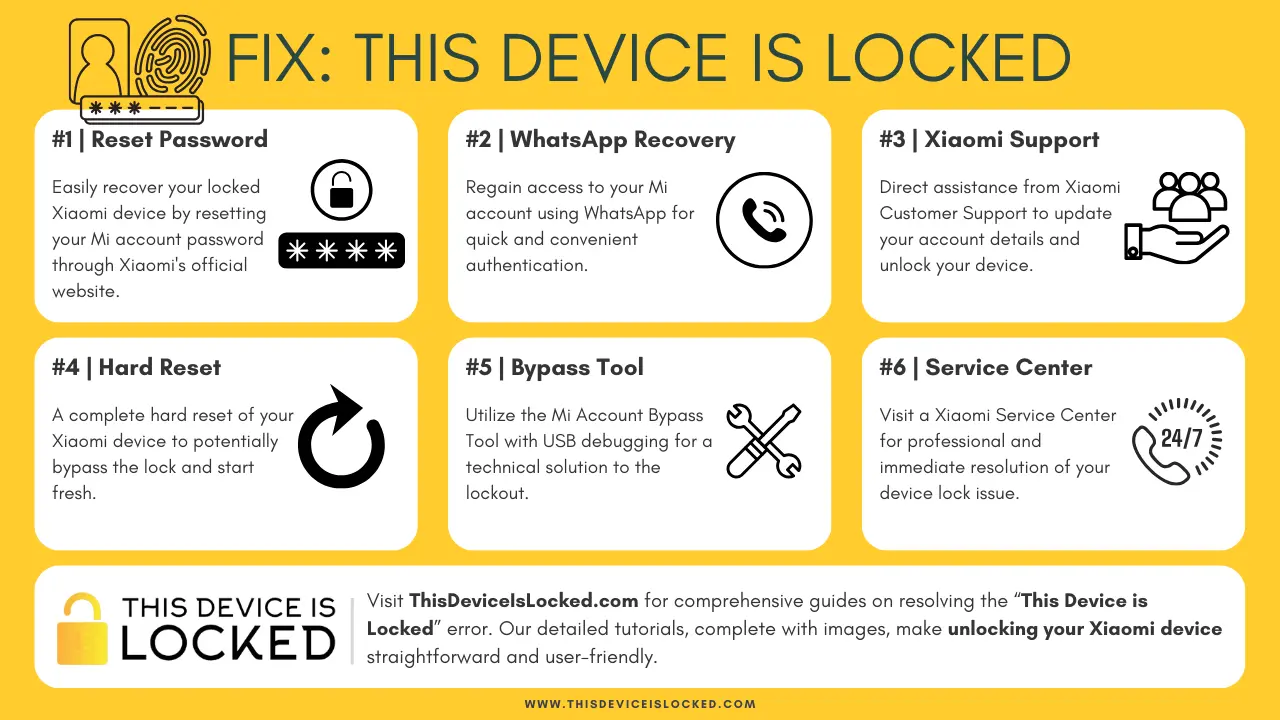
Reasons for the “This Device is Locked” Error
The error can appear for several reasons, often without the user realizing it:
- Resetting the device without removing the Mi account.
- Installing new custom ROMs.
- Wiping data using recovery modes.
- Forgetting screen passwords.
How to Unlock the “This Device is Locked” Error
If entering your Mi account credentials doesn’t solve the problem, try these methods:
Forgot Your Mi Account Passwords
Unlock Mi Account Using WhatsApp
Request Xiaomi Customer Support
Hard Reset Your Xiaomi Device
Mi Account Bypass via Removal Tools
Professional Service Consultation
Note: The methods provided here are not guaranteed to solve your problem 100%, but they aim to help you fix the issue.
1. Forgot Mi Account Passwords
This method involves resetting your Mi account password via Xiaomi’s official website, a straightforward process for regaining access to your locked device.
If you’ve reset your device and see the message “This Device is associated with an existing Mi account” or “This device is locked,” you’ll need to re-enter your Mi account credentials. If you’ve forgotten your Mi account password, follow these steps:
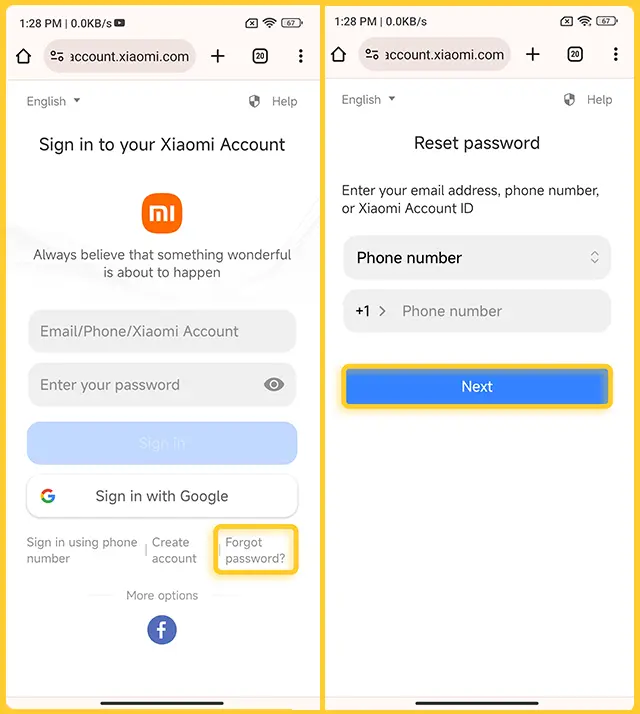
- Visit the official Xiaomi website on another device.
- Click on “Forgot Password.”
- Enter the phone number or email ID associated with your Mi account and click “Next.”
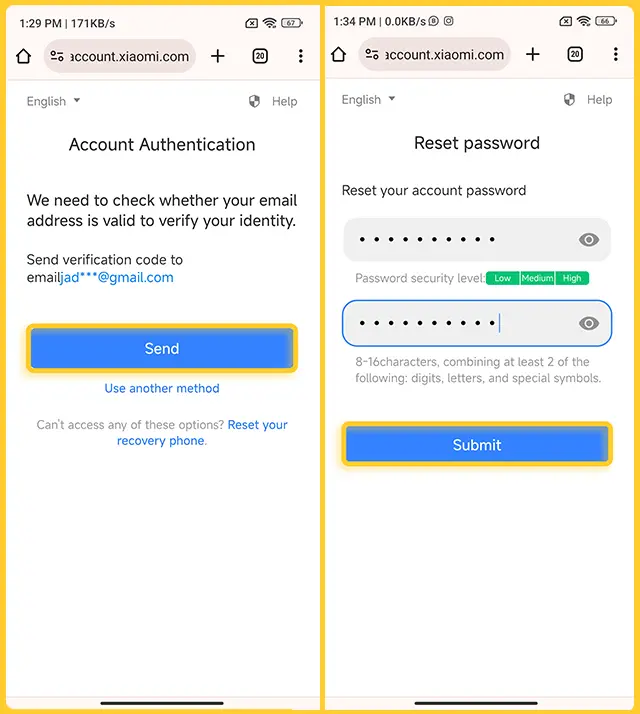
- Follow the prompts for “Account Authentication” and click the “Send” button.
- Check your email or phone for a 6-digit verification code.
- Enter the code in the verification box, set a new password, and submit.
Enter these credentials on your locked device. Once verified, your phone will unlock.
2. Unlock Mi Account Using WhatsApp
A convenient alternative for recovering your Mi account, especially when email access is not available, using WhatsApp for verification.
If you can’t access your email, you can recover your Mi account ID using WhatsApp:
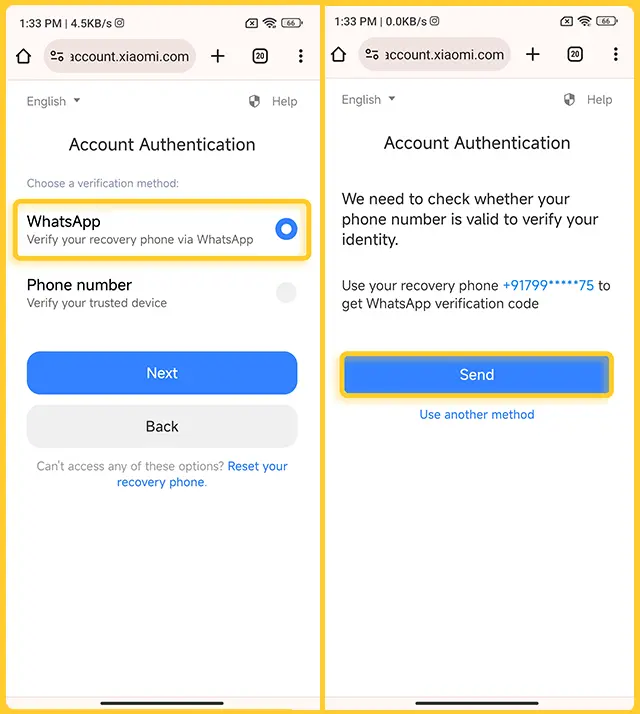
- Visit the official Xiaomi website and go to the “Forgot Password” page.
- Click on “Use another method.”
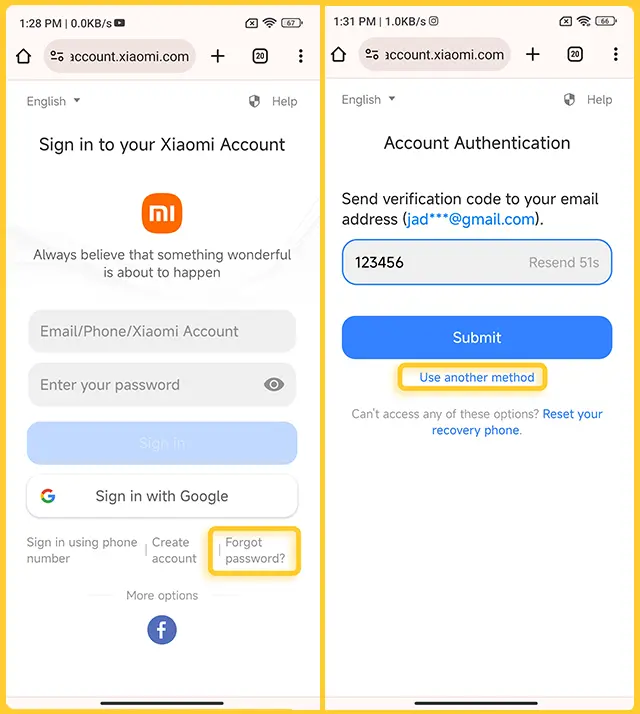
- Select WhatsApp or Phone Number and click “Next.”
- Tap “Send” to receive a verification code on WhatsApp.
- Enter the code under the Account Authentication tab and submit.
- Reset your password on the next screen.
3. Request Xiaomi Customer Support
Direct assistance from Xiaomi’s customer support to update your account details, ideal for users who have lost access to their registered credentials.
If you can’t access your phone or email, request Xiaomi customer support to change your phone number or email ID linked to your Mi account:
- Visit the official Xiaomi website.
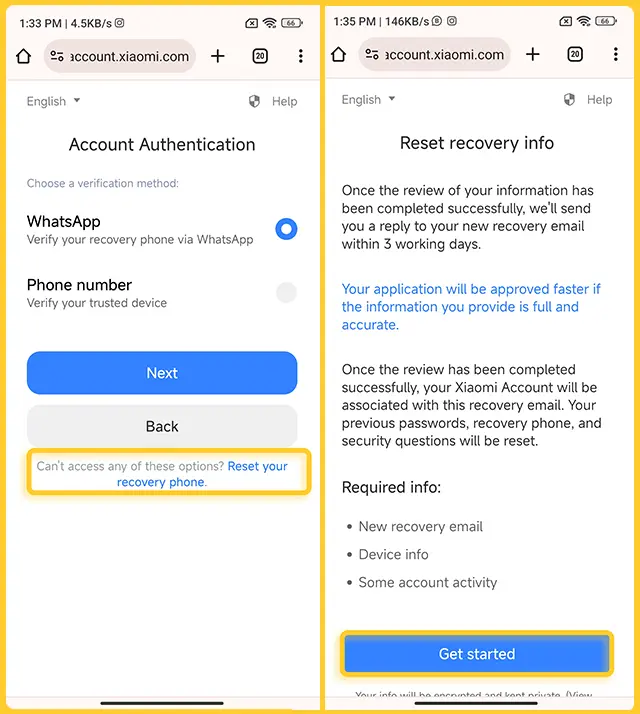
- Navigate to Forgot Passwords > Use another method > Reset your recovery phone.
- Tap “Get started” and enter a new recovery email, then send a verification code.
- Once Xiaomi confirms your request, you’ll receive an email with new login details.
4. Hard Reset Your Device
A hard reset clears all data and potentially bypasses the lock, suitable for those who have exhausted other account recovery options.
If all other methods fail and you can’t recall your ID, phone number, or any account details, a hard reset might be your best option. Please note that this will erase all data on your phone.
- Turn off your device completely.
- Simultaneously press and hold the “Volume Down” and “Power” buttons. Continue holding these until the device enters Recovery Mode.
- Once in Recovery Mode, use the “Volume Down” button to navigate to the “Wipe Data” option. Press the “Power” button to select it.
- Press the Power button again to confirm your decision to wipe the data. Your device will automatically restart.
After your device powers on, check if the “This Device is Locked” error has been resolved. This method is effective for those who haven’t already reset their device and are encountering this error. If you have previously reset your device and are still facing the issue, you might want to try Method 5, which involves using the Mi Account Removal Tool.
5. Mi Account Bypass via Removal Tools
Utilizes a specialized tool for users comfortable with technical procedures, offering a more hands-on approach to bypassing the account lock.
If your device USB debugging is on, then this method 100% solve your problem. But for this you need to required a PC. Just connect your phone to your computer and follow below steps.
- Enter Recovery Mode by pressing “Volume Down” and “Power.”
- Connect your phone to a PC and open the Mi Account Unlock Tool.
- Select your device and choose “Bypass Mi Account” and “Disable Mi Account.”
- Your device will reboot and should function normally.
Note: If your device is locked and you haven’t previously enabled USB Debugging in the developer options, the methods involving USB Debugging might not work for you. USB Debugging is a crucial setting that needs to be activated before the device gets locked for certain solutions to be effective.
6. Professional Service Consultation
Involves getting in-person assistance at a Xiaomi service center, ensuring professional help for complex situations.
If you’ve tried all the above methods without success, your final recourse is to visit the nearest Xiaomi service center. Don’t forget to bring a copy of your original invoice. This is how it works:
- The original invoice is crucial as it proves your ownership of the phone.
- Talk to a Xiaomi executive at the service center about your issue. Explain when and why the “This Device is Locked” error occurred.
- The Xiaomi team will first verify that you are the legitimate owner of the phone by checking your invoice. Once your ownership is confirmed, they can immediately start working on fixing your problem.
How to get rid of the “This Device is Locked” Error
To avoid facing the “This Device is Locked” error after a reset, especially for developers or users who frequently change ROMs, consider disabling the security feature that triggers this error:
- Navigate to your phone’s settings and open your Xiaomi Account.
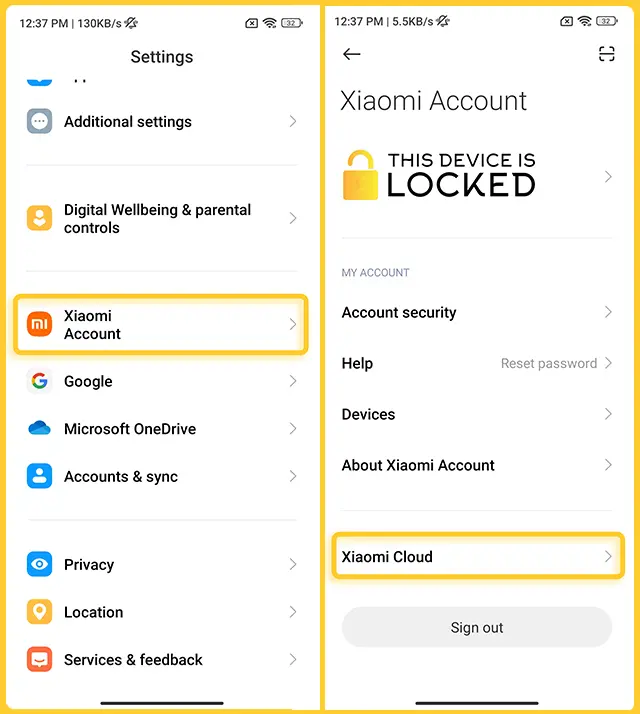
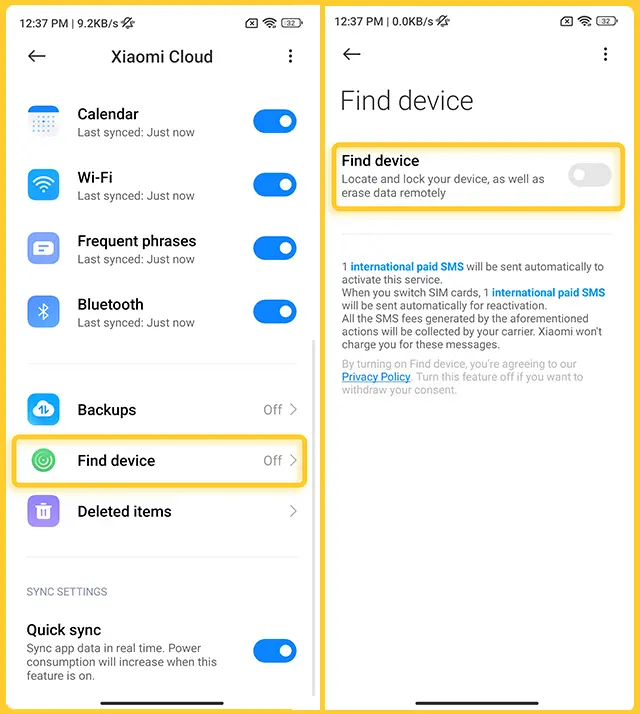
- Go to Xiaomi Cloud > Find Device.
- Toggle off “Find Device.”
By following these steps, you can proactively prevent future occurrences of the “This Device is Locked” error, ensuring smoother, uninterrupted use of your Xiaomi device.
FAQs
DMCA: We at ThisDeviceIsLocked.com respect intellectual property rights and adhere to the Digital Millennium Copyright Act (DMCA) regulations. We promptly address and comply with any valid infringement notices received.
Disclaimer: This site is an independent platform and is not affiliated with Xiaomi or any of its associated companies. Our content is created to share information and enthusiasm about Xiaomi products, independently.
